Pages

Thank you for visiting my site! I am new to the blogging world, so please forgive any layout malfunctions.

Saturday, February 25, 2012

A Perfect Mess


A Perfect Mess


        I recently read a book that had a profound effect on my life. It is The Birth Order Book by Dr. Kevin Leman. You can view the book by clicking here.  I recommend everyone read this book, it will give you a new perspective on behavior and personal interactions. Now that I have given credit where credit is due, let me tell you a little about what I learned and the impact it had on my daily routine. 

     I am a first born and I have always been confused because I consider myself to be a perfectionist, but I am also very messy and tend to procrastinate. Since the birth of my son, the messiness and procrastination have only gotten worse, and I really wasn't sure how to go about creating better habits for myself. The inability to fix myself was becoming rather annoying. 

  At church, the Pastor had been doing a series on David and mentioned how birth order affected his life and recommended we all read The Birth Order Book. I had previously read another book by Dr. Leman and loved it, so I eagerly purchased it with no idea the profound impact it would have on my life. The following is one of the quotes that help me understand my struggles.
" A major reason behind the procrastination is the perfectionist fear of failure. The procrastinating perfectionist has such high expectations that he or she is afraid to start a project. He or she would rather stall and rush to get something done at the last minute. Then the procrastinator can say, "If there had been more time, I could have done a much better job."

  Since my little one was born, my house has been messy with a couple really clean areas. Then I would let the really clean areas get messy while I focused on cleaning somewhere else. I only like to start projects if I can do them start to finish perfectly. I know it's laughable now, but it has taken me a full year to see the folly in this train of thinking.
    A perfect example is my kitchen floor. I would see the floor was dirty during the day and think "Gosh the floor needs to be cleaned, I'll sweep and mop after LO is asleep tonight". I wanted to be able to devote my full attention to a thorough, deep cleaning. Night would get here and I would either have more pressing tasks to get done, or I would want to just chill out and do something I enjoyed.  This cycle might go on for a few days before the floor got so dirty it was embarrassing.
      It wasn't until I understood how my perfectionism was actually hindering my progress, that I was able to break this behavior pattern. I have adapted by sweeping multiple times a day. Sometimes I sweep the whole kitchen other times I sweep just one area at a time, hoping that by the end of the day I will have gotten the whole thing. I mop when I have time and don't stress over it (as much). My floor is overall much cleaner, I rarely get to the embarrassingly dirty stage anymore.
         Being willing to start a task and work on it in bits and pieces has actually helped me get more done in a day and be less stressed. I wish I had something to say to the middle born and last born but frankly I am simply not equipped. I would love to hear from you if you have any habits related to your birth order and how you have overcome them!


Monday, February 20, 2012

Perfected Potato Pattie


Perfected Potato Pattie

For the past five years my husband and I have been testing different way to make potato cakes. This attempt started like all the rest, we had some mashed potatoes that were going to go bad, so we made up some patties for breakfast. We tasted the first cakes to come out of the grease and were blown away by how good they were. My husband turned to me and said "you have to put this on your blog", so I grabbed the camera and snapped pictures of the last couple as we cooked them. 


We started with regular mashed potatoes, using the electric mixer we add sour cream, cheddar cheese and finally diced onion. We made the patties on floured counter, we used quite a bit of flour. 


Put the patties right into hot canola oil. Flipping them once after they were really crispy. 


This is super easy and quick breakfast or snack! I refuse to throw away left overs and this is a great way to use up left over mashed potatoes. The key ingredient is the sour cream, we added it until it seemed like a good constancy. I didn't bother trying to figure out measurements since the amount of potatoes you have to start with will be different for everybody and change the amounts of all the other ingredients. 


I hope you enjoy this simple breakfast dish!


Monday, February 13, 2012

How To Fix a Hole in the Wall


How To Fix a Hole in the Wall

Let me start this post by saying I am, in no way, shape or form ,a professional or have any formal training on drywall. I'm just a girl who loves to build and fix things with a husband who thinks he can (and usually succeeds) in fixing anything. 
Our friends put a huge hole in their wall and didn't want to pay an outrages fee for their landlord to fix it, so we volunteered to help. It was an easy, fun fix.

supplies to buy

• Dry wall joint tape
• Dry wall screws 
• 1x1 scrap wood (we used studs)
• Med and fine grit sanding blocks 
• Quick set or premixed joint compound 
• Decent size piece of dry wall
• level

supplies I had on hand

• utility knife 
• paint scraper
• drill/charger 
• pencil
• hand saw
• bucket if you use the quick set we mix our selves 
• old blanket to lay on floor when painting
• tape measure

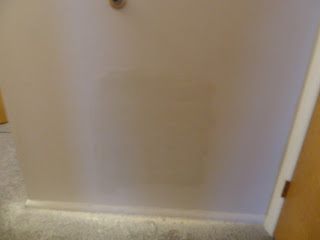
The Hole


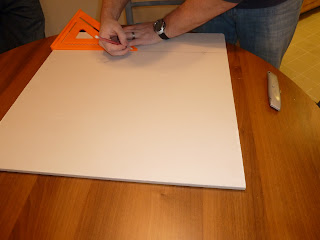
We started by using a box cutter to cut the drywall into a rectangle and expose the studs. We used a level to make the cut straight. 


We sanded the edges really, really well. This was by far the most time consuming part of the repair.


We bought a sheet of drywall at the hardware store, and cut to the size of the rectangle we cut. We cut the drywall slightly on the large size, just so we didn't error on the side of too small. Then we sanded the wall and the new piece of drywall where needed until it was a good fit. 


Insert the new drywall in the hole, then use drywall screws to secure drywall to the studs. Try not to sink the screws. Apply joint tape over all the seems, we used a mesh a tape. 


 Spread the drywall joint compound over the patch tapering around the edges. 


Sand and reapply compound, sand again then paint! This is the finished patch minus the paint. 
I think it looks pretty good! Once painted the wall will look good as new.


It was a relatively inexpensive project. Supplies cost around $25, plus the new tools we bought just because we had an excuse. 
The following links are the resources I used to make sure we knew what we were doing. I hope you never end up with a hole in your wall, but if you do, you now know how to fix it!


Tuesday, February 7, 2012

DIY Tile Decoration


DIY Tile Decoration 


       I saw the neatest idea, used several different ways on Pintrest, where tile was used as a dry erase board. Through my own experiments, I found out that it doesn't have to be the super shiny tile it can be the slightly textured tile as well. I didn't try the super textured tile. 
      For me this project was a two for one win. I had been trying to find cheap ways to spruce up my bathrooms and I had been searching for way to neatly display the bible verses I was trying to memorize. 


-My supplies, minus some embroidery thread that matched the ribbon I had to add when I figured how hard it was to tie a bow. The tile was .77 a piece, the ribbon was like $2.50,  and I had everything else, so this project cost me under $5. 


-I started by deciding how long I wanted my ribbon, then cutting all three pieces. 


-I cut the ribbon in half, hot gluing the back corners of the tile.


-I then glued the ribbon together to form a point 


I added a bow to cover the overlap of ribbon and I really like the way it turned out. I had to figure out how to tie a bow. This was by far the hardest part for me, I don't tie bows very often. I Googled a bunch of websites, the one I used seems to no longer exist , but this blog has a pretty good step by step. 
http://www.undertheinkfluence.com/?p=275


-After I figured out how to make the ribbon work, this was maybe a 20 minute project, probably less. 


- I hot glued the bow to the point


-last I used my dry erase marker to write the verses I want to memorize 


-My bathroom mirror before. I hated how tacky it looked and how annoying it was when I cleaned. 


-My bathroom now


-They make me so happy to look at! I tried to include a little bit of the shower curtain in the picture so you could see why I chose the colors I did.